Production schedule:


The setup:

Problems & solutions:
For the dance segment, I forgot to take a picture of the setup, so I drew it instead. I had booked a camera grip, but when we tested it, the footage came out shaky and wobbly. To solve this, I came up with the idea of using a hair trolley to stabilize the camera by placing it on top of the trolley. Since there weren’t enough people available to both record and dance, my dad stepped in to help with the recording. I instructed him on the shots we needed, which involved moving the trolley back and forth and focusing on each dancer's part. For the lighting, I placed LED lights on each side of the setup. The lights emitted blue and red colours, which I had researched and chosen specifically for this project.
LED SETUP:

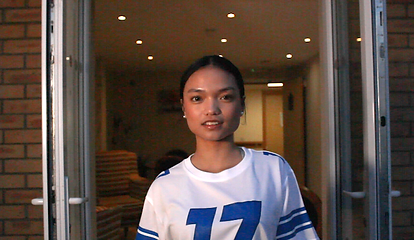
I set the LED lights to the right side of the interviewee to create a balanced lighting effect, providing depth and dimension to their face. This positioning highlights their features and ensures they are well-lit without harsh shadows. I assembled the lights by placing the batteries in the appropriate slots and setting up the stand. I adjusted the lights to their highest setting to ensure the interviewee was clearly visible on camera. Since this was an interview, I decided not to use colored filters on the lights. Using such filters could have altered the natural appearance of the footage, making it look unprofessional and inaccurate.


For the dance segment, I used red and blue filter. Unfortunately, the red filter was too dominant, making my face appear overly red, while the blue filter didn't come through that clearly. When I attempted to correct this using colour grading in Premier pro, the results were unsatisfactory, The colours looked unnatural, and the video ended up looking very grainy. I tried fix the graininess with the sharpen tool


camera/ interview setup:
The camera screen was completely black, so I initially tried increasing the brightness to see if that would resolve the issue, but it didn’t help. After reviewing the footage I had taken, I found it was still dark. To address this, I decided to brighten the footage during post-production using Adobe Premiere Pro. This approach would allow me to adjust the exposure and lighting to achieve the desired brightness and clarity for the final video. While it’s always preferable to get the best possible footage during the shoot, post-production adjustments can
-effectively correct underexposed footage and ensure a high-quality result. For the setup, I positioned the tripod on the right side of the interviewee. This placement was chosen to direct the interviewee’s attention towards the host rather than the camera, helping them feel more comfortable and less nervous during the interview. This positioning also ensures a natural conversational flow, making the footage look more engaging. Additionally, I set up an off-the-shoulder camera angle to add variety to the shots. This perspective avoids the static and potentially monotonous feel of a single, head-on shot, making the visual composition more dynamic and interesting.
Microphone set up:

For my microphone setup, I initially planned to use a sound kit, but it wasn't available, so I opted for a handheld microphone instead. During interviews, I had my friends hold the mic for convenience, but this led to some background noise issues affecting the sound quality. To address this, I intend to edit out the unwanted noise during post-production. In the future, I may explore using a different microphone to minimise background noise during recording or employing microphone stands to reduce handling noise. These adjustments should help me achieve cleaner audio for my interviews and ensure a more professional listening experience overall.
Film evaluation:
Overall, the major downside of filming was that I had only one day to complete it. Although my production plan outlined 3 to 4 filming sessions over two weeks, this was not feasible as most of my friends were unavailable during that period, and I was unwell. This limitation significantly compressed our filming schedule, which could have impacted the overall quality and variety of the footage. However, despite these challenges, I believe the footage turned out well. The primary issue was that the footage was darker than desired, but this can be corrected by brightening it in post-production. In summary, while the constrained timeline was a drawback, the final footage is promising. With some adjustments in Adobe Premiere Pro, I am confident that the end result will meet my expectations.
Editing reflection:
BEFORE:


after:

Solution:


While filming, I realized that the camera settings had likely been changed by the previous user. I initially thought the only issue was the brightness. However, the video turned out very dark, making it hard to see anything. To fix this, I used Adobe Premiere Pro to adjust the brightness to 93 and the contrast to 72, ensuring the video didn't look too harsh. Additionally, I used the Lumetri Colour tool for colour correction. I used the dropper tool to balance the colours by selecting something white in the video, and then made further adjustments to correct the yellow tint.
BEFORE:

After:

In this lesson, I added black bars to the film to give it a more cinematic look. I started by creating an adjustment layer in Adobe Premiere Pro. After creating the layer, I resized it to form the black bars at the top and bottom of the screen, mimicking a widescreen aspect ratio. Once I had the black bars set to the desired size, I dragged the adjustment layer across the entire timeline, ensuring it covered the entire duration of the video. This way, the black bars were consistently present from the beginning to the end of the documentary, enhancing its cinematic quality. Additionally, I carefully added all the necessary video clips to the timeline, arranging them in the desired sequence. I also deleted any unwanted footage to ensure a smooth and coherent flow for the documentary.

BEFORE:

After:


In this lesson, I focused on colour correcting the film because the original lighting in the video was too intense and created an unbalanced look. To achieve a more aesthetically pleasing and natural appearance, I used the colour wheel in Adobe Premiere Pro. This tool allowed me to adjust the colour balance, tone, and saturation of the footage. Since it was my first time using the colour wheel, I experimented with various settings to see how they affected the overall look of the video. By playing around with the different options, I gradually refined the colours to make them look more visually appealing and cohesive. The process involved tweaking the highlights, shadows, and midtones to ensure the final result was balanced and enhanced the documentary's visual impact.
Additionally, I added bar titles to each interview segment to provide clear identification and context for the viewers. I created these titles by selecting the text tool in Premiere Pro and designing a clean, professional layout for the names and titles of the interviewees. I positioned the bar titles at the bottom of the screen, making sure they were readable and did not distract from the main content. By incorporating these elements, I enhanced the documentary's professionalism and clarity, making it easier for the audience to follow and understand the interviews. This comprehensive editing process, including colour correction and the addition of bar titles, significantly improved the overall quality and coherence of the documentary.


In this lesson, I added video compilations that my friends and I made to demonstrate that our interest in dance extends beyond this project and into our everyday lives. These clips showcase the variety of dance styles we practice, highlighting that we don't limit ourselves to just one genre. This variety links with the brief because it emphasizes our genuine passion for dance as a hobby and its impact on our personal lives. The inclusion of these diverse dance videos helps illustrate the breadth of our involvement in dance and underscores its importance to us. Additionally, I incorporated subtitles into the first interview since my friend spoke in Tagalog. Initially, I tried to follow a YouTube tutorial to simplify the subtitle-adding process.
Moreover, to ensure clarity and coherence during our interviews, I meticulously added transitions to the text whenever speakers switched, creating a seamless flow in our dialogue segments. However, Premiere Pro encountered an error, preventing me from using the automated method. As a result, I had to manually create the subtitles. This involved carefully transcribing the dialogue and ensuring that the subtitles were accurately timed to match the spoken words. This effort was essential to make the content accessible and understandable to all viewers, regardless of their language proficiency. By including both the video compilations and the subtitles, I enhanced the documentary's depth and accessibility, making it more engaging and comprehensible for the audience.


Additionally, to enhance the introduction of our project, I incorporated a subtle background music during the voiceover narration. This choice was made to prevent the introduction from sounding monotonous and to engage the audience from the outset. Careful consideration was given to ensure the background music was not overly loud, allowing my voice to remain clear and prominent without being overshadowed. This decision not only added a dynamic element to the project but also underscored the importance of audio balance in creating a cohesive and engaging presentation. To obtain these sounds, I used a YouTube mp3 downloader.
https://youtu.be/gOLB0kWxJak?si=a1VGyDf1pF9KlV0z
https://www.youtube.com/live/AhJ9-AtFje0?si=39IpeP-gInZ04dsf
Sound editing reflection:
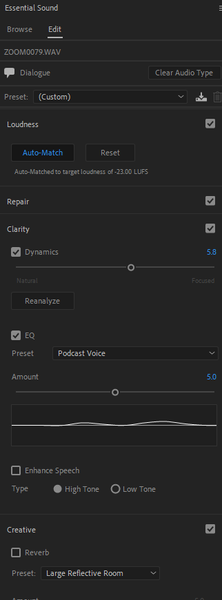

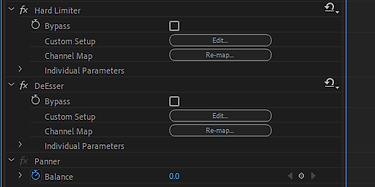

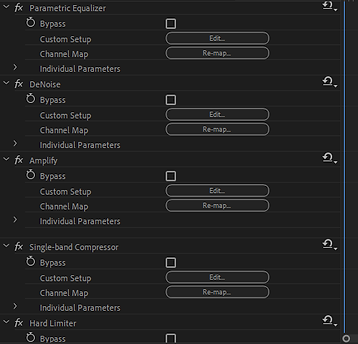
For the sound of the interviews, I applied various editing techniques to ensure the voices sounded cinematic and natural, rather than robotic. Using Premiere Pro's Essential Sound panel, I fine-tuned the audio by adjusting settings such as auto loudness matching for consistent volume levels, clarity enhancement set to 5.8 for clear and articulate speech, and applied the podcast voice EQ pre-set with an amount of 5 to optimize vocal tones. Additionally, I incorporated a creative effect simulating a large reflective room to add depth and ambiance. To further refine the audio quality, I included a hard limiter to prevent distortion from peaks, a de-esser set to -40dB to minimize harsh sibilance, and used a parametric equalizer to adjust specific frequencies, particularly reducing number 3. De-noising was applied to eliminate background noise, amplification ensured uniform volume levels, and a single-band compressor smoothed out dynamic fluctuations in the voice recordings. These adjustments collectively aimed to enhance the interviewee's voices for a polished and professional sound suitable for our project presentation.

In the audio, there was noticeable background noise that posed a challenge during editing. I experimented with tools like the de-noise and the pen tool in an attempt to mitigate its noise, but the results were minimal. Despite adjusting settings and making careful selections with the pen tool to isolate and attenuate the noise, it persisted at a noticeable level. This underscored the complexity of audio editing, highlighting the importance of employing effective noise reduction techniques and perhaps exploring alternative approaches or software plugins to achieve clearer and more professional audio quality.
Final Edit:
In my opinion, this final edit was successful even though when I was filming the video was black to start with so I had to edit every single video to look brighter and better which was time consuming but in the future, I know that I would have to check the camera first before doing anything to see if there are any problems. With the editing, at the start, I had to put a slow motion effect so that the video would be longer, it did look weird and it would have been better if there wasn't but I didn't have enough b-roll to make the start longer. I needed it to be longer because of the voiceover, introducing the film and saying what it is about. This links back to the brief since it focuses on hobbies which made me think that dance was a good option to pick for the documentary, I wanted my audience to see that dance is a universal language and it can help us feel at ease if we learn. Overall, this documentary was a success even if there were problems but I thought of how to make it work and it did.
BEFORE:
After:
In this lesson, I added black bars to the film to give it a more cinematic look. I started by creating an adjustment layer in Adobe Premiere Pro. After creating the layer, I resized it to form the black bars at the top and bottom of the screen, mimicking a widescreen aspect ratio. Once I had the black bars set to the desired size, I dragged the adjustment layer across the entire timeline, ensuring it covered the entire duration of the video. This way, the black bars were consistently present from the beginning to the end of the documentary, enhancing its cinematic quality. Additionally, I carefully added all the necessary video clips to the timeline, arranging them in the desired sequence. I also deleted any unwanted footage to ensure a smooth and coherent flow for the documentary.
BEFORE:
After:

In this lesson, I focused on colour correcting the film because the original lighting in the video was too intense and created an unbalanced look. To achieve a more aesthetically pleasing and natural appearance, I used the colour wheel in Adobe Premiere Pro. This tool allowed me to adjust the colour balance, tone, and saturation of the footage. Since it was my first time using the colour wheel, I experimented with various settings to see how they affected the overall look of the video. By playing around with the different options, I gradually refined the colours to make them look more visually appealing and cohesive. The process involved tweaking the highlights, shadows, and midtones to ensure the final result was balanced and enhanced the documentary's visual impact.
Additionally, I added bar titles to each interview segment to provide clear identification and context for the viewers. I created these titles by selecting the text tool in Premiere Pro and designing a clean, professional layout for the names and titles of the interviewees. I positioned the bar titles at the bottom of the screen, making sure they were readable and did not distract from the main content. By incorporating these elements, I enhanced the documentary's professionalism and clarity, making it easier for the audience to follow and understand the interviews. This comprehensive editing process, including colour correction and the addition of bar titles, significantly improved the overall quality and coherence of the documentary.
In this lesson, I added video compilations that my friends and I made to demonstrate that our interest in dance extends beyond this project and into our everyday lives. These clips showcase the variety of dance styles we practice, highlighting that we don't limit ourselves to just one genre. This variety links with the brief because it emphasizes our genuine passion for dance as a hobby and its impact on our personal lives. The inclusion of these diverse dance videos helps illustrate the breadth of our involvement in dance and underscores its importance to us. Additionally, I incorporated subtitles into the first interview since my friend spoke in Tagalog. Initially, I tried to follow a YouTube tutorial to simplify the subtitle-adding process.
Moreover, to ensure clarity and coherence during our interviews, I meticulously added transitions to the text whenever speakers switched, creating a seamless flow in our dialogue segments. However, Premiere Pro encountered an error, preventing me from using the automated method. As a result, I had to manually create the subtitles. This involved carefully transcribing the dialogue and ensuring that the subtitles were accurately timed to match the spoken words. This effort was essential to make the content accessible and understandable to all viewers, regardless of their language proficiency. By including both the video compilations and the subtitles, I enhanced the documentary's depth and accessibility, making it more engaging and comprehensible for the audience.
Additionally, to enhance the introduction of our project, I incorporated a subtle background music during the voiceover narration. This choice was made to prevent the introduction from sounding monotonous and to engage the audience from the outset. Careful consideration was given to ensure the background music was not overly loud, allowing my voice to remain clear and prominent without being overshadowed. This decision not only added a dynamic element to the project but also underscored the importance of audio balance in creating a cohesive and engaging presentation. To obtain these sounds, I used a YouTube mp3 downloader.
https://youtu.be/gOLB0kWxJak?si=a1VGyDf1pF9KlV0z
https://www.youtube.com/live/AhJ9-AtFje0?si=39IpeP-gInZ04dsf
Sound editing reflection:
For the sound of the interviews, I applied various editing techniques to ensure the voices sounded cinematic and natural, rather than robotic. Using Premiere Pro's Essential Sound panel, I fine-tuned the audio by adjusting settings such as auto loudness matching for consistent volume levels, clarity enhancement set to 5.8 for clear and articulate speech, and applied the podcast voice EQ pre-set with an amount of 5 to optimize vocal tones. Additionally, I incorporated a creative effect simulating a large reflective room to add depth and ambiance. To further refine the audio quality, I included a hard limiter to prevent distortion from peaks, a de-esser set to -40dB to minimize harsh sibilance, and used a parametric equalizer to adjust specific frequencies, particularly reducing number 3. De-noising was applied to eliminate background noise, amplification ensured uniform volume levels, and a single-band compressor smoothed out dynamic fluctuations in the voice recordings. These adjustments collectively aimed to enhance the interviewee's voices for a polished and professional sound suitable for our project presentation.
In the audio, there was noticeable background noise that posed a challenge during editing. I experimented with tools like the de-noise and the pen tool in an attempt to mitigate its noise, but the results were minimal. Despite adjusting settings and making careful selections with the pen tool to isolate and attenuate the noise, it persisted at a noticeable level. This underscored the complexity of audio editing, highlighting the importance of employing effective noise reduction techniques and perhaps exploring alternative approaches or software plugins to achieve clearer and more professional audio quality.